About The Review:
This ASUS VN279QL monitor was provided by ASUS for review purposes. I will be reviewing the build construction, picture quality, and overall technical performance of the VN279QL, including input lag performance.
Display Details
| Size: | 27″ | Panel: | 8-bit |
| Resolution: | 1920 x 1080 | Dynamic Contrast Ratio (ASCR): | 1M:1 |
| Aspect Ratio: | 16:9 | Panel Type: | AMVA+ |
| Response Time: | 5ms GTG | Viewing Angle: | 178/178 |
| Display Colors: | 16.7 Million (real 8-bit) | Color Gamut: | sRGB |
Inputs, Features, & MSRP
| Inputs/Outputs: | 1x HDMI | 1x VGA | 1x DisplayPort | 1x Headphone/Line-In |
| Features & MSRP: | 2W x 2 Speakers | under $299 on Amazon | – | – |

The ASUS VN279QL, At A Glance:
The ASUS MX279H was one of ASUS’ sleeper hits last year for gamers. Not only did it boast an ultra low input lag rating of 9ms (being the fastest display in our database), it also featured a gorgeous 27″ IPS display, which made a world of difference when compared to TN panels. The VN279QL, by comparison, is similar to the MX279H. It offers a 27″ 1080p display, however the IPS panel has been substituted for an AMVA+ panel. The question remains, does this monitor retain the same excellent gaming performance as the MX279H? Keep reading to find out.
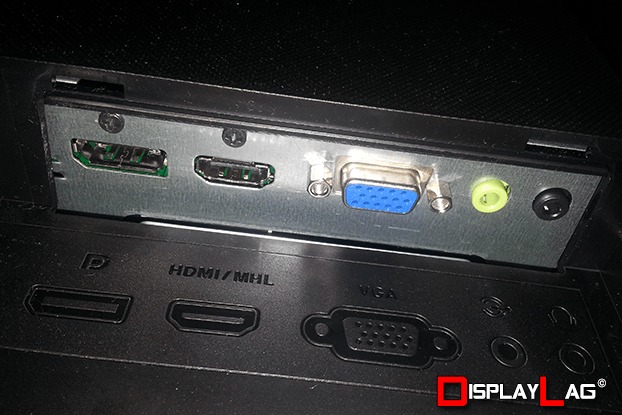
The ASUS VN279QL features HDMI, D-Sub, and DisplayPort connections, as well as headphone and line-in. Unfortunately, it lacks a DVI connection.
The VN279QL is admittedly a little light when it comes to input variety. While the essentials are here, such as HDMI, D-Sub, and DisplayPort, the lack of a DVI connection may upset some users. Though, it is important to note that the monitor will accept DVI when connected via a DVI > HDMI adapter (as they are both digital connections, there is no conversion involved). I would have liked to see at least one more HDMI port, especially due to the exclusion of DVI. Headphone and line-in ports are included for audio, and the monitor does include built in stereo speakers. They do their job, just don’t expect them to fill the room with audio as they are 2W speakers. ASUS generously provides HDMI > MHL, HDMI > DVI, DisplayPort, D-Sub, and line-in cables right out of the box, so you don’t need to invest in many external accessories to connect your equipment. There is an input cover that hides the input labels by default, though it can be easily removed to allow easier access to the inputs. I highly recommend doing so.
The monitor keeps a very sleek profile for it’s size, weighing in at around 13 pounds. Adding to its cool factor, it features an extremely slim bezel, similar to the MX279H. The bezel measures at approximately 0.8cm thick, which is much thinner than most monitors preceding it. The stand is built well; it features a solid circular base and offers full height adjustment. The monitor can also be placed vertically into portrait mode. The thin bezel allows it to look rather snazzy in this position as well.
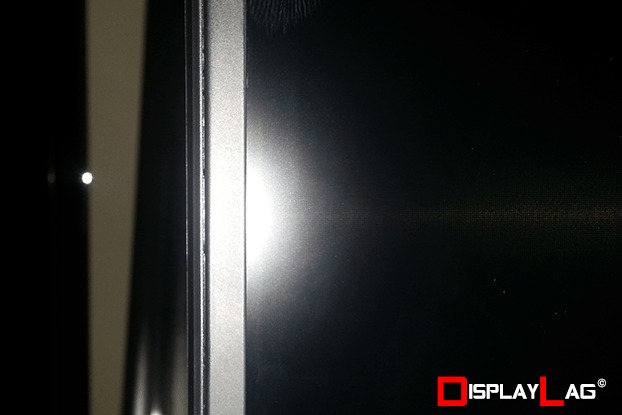
The bezel on the VN279QL is really thin, measuring at approximately 0.8cm thick.
Panel Specs:
The ASUS VN279QL features a 27″ display complete with 1920 x 1080 resolution (conforming to full HD standards). This resolution features a 16:9 aspect ratio, which is common among movies and games. Response time is specified to be 5ms GTG, which is very good for a non-TN panel, along with a 60hz native refresh rate. The native contrast ratio isn’t officially listed, though the contrast is measured to be 1M:1 dynamically (labeled as ‘Smart Contrast Ratio’ by ASUS). Those that despise glare would be happy to know that the monitor features a matte finish, making it versatile in a variety of environments. In terms of color output, the monitor is capable of displaying 16.7 million colors via a true 8-bit AMVA+ panel. MVA technology is known to be very good when it comes to displaying black, as some other technologies such as TN are prone to make blacks seem a bit gray. Viewing angles are measured to be 178 vertically and horizontally.
Buttons:
At first, I was confused, as I couldn’t find the buttons to control anything on the screen. This was odd to me, because buttons are traditionally located directly below the corresponding labels for them. I soon discovered that the buttons are located behind the panel itself. The hard buttons feel smooth, though some users will find it difficult to use them in dark rooms. You will have to memorize the functions of each button in this scenario, as the labels are painted onto the bezel and do not feature a backlight. To their credit, they respond extremely well and suffer from no noticeable delay.
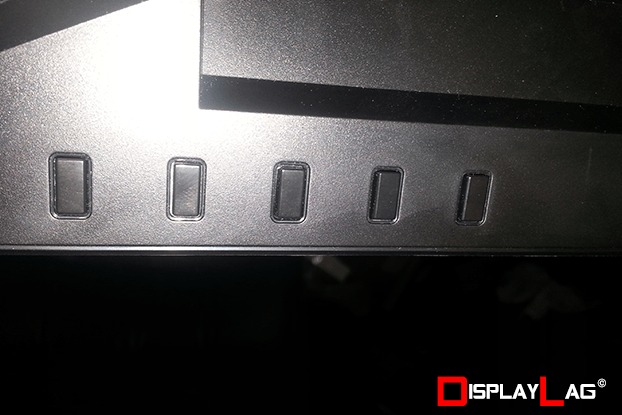
The buttons are located behind the display and work great, but will take some memorization in dark rooms.
Viewing Angles:
One of the biggest problems with TN panels are their poor viewing angles, which will shift the gamma and colors of your display depending on the placement of your head. With IPS and MVA, viewing angles are very consistent till you start moving your head to the extreme edges of the screen. The VN279QL offers great leniency, with no noticeable shifting of colors or gamma unless you move your head towards the edge of the display. ASUS rates the viewing angles at a full 178 degrees vertically and horizontally.
Menu Items and Features (OSD)
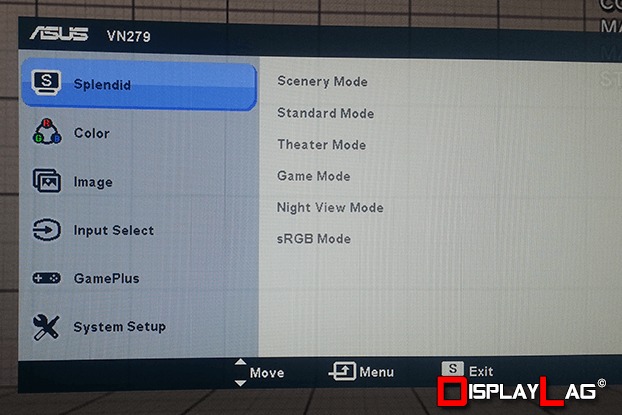
The VN279QL stays consistent with ASUS’ signature OSD. Default picture modes included Scenery, Standard, Theater, Game, Night View, and sRGB. Some of these modes can be further tweaked with Brightness, Contrast, Saturation, Color Temperature, and Skin Tone adjustments, allowing you to fine-tune your preferred picture mode. The majority of these options can be configured in every mode, with the exception of sRGB. Aspect control is present, along with panel overdrive (called Trace Free) and a special setting called Vivid Pixel. Vivid Pixel is essentially a form of controlling sharpness in large chunks. Setting it too high will severely distort how your image looks. I recommend keeping it disabled, or at 25 if you need a little bit of sharpness for lower resolution sources. I got a little excited when I saw a setting labeled Game Plus, assuming that it was some kind of super game mode to reduce input latency. However, all Game Plus does is put your choice of a crosshair or a countdown timer on the screen itself, overlaying your source. I can’t really imagine many people using these features, as most shooting games feature adequate crosshairs for aiming. Going to System Setup allows you to configure speaker volume, ECO mode, key lock, OSD layout, and more.
Black, White, and Color Output:
Upon browsing the available options, I noticed that there wasn’t an option to configure black level, only panel backlight and contrast. I was concerned about the black level being set incorrectly, which would result in black crush or grayish blacks. While graphics cards can remedy this using their own color calibration tools, this would have proved difficult for devices that output fixed gray scale settings, such as video game consoles. The good news is, the black level is perfectly set out of the box, and wouldn’t have required any adjustment regardless. I was able to discern the difference between all squares using the black level test pattern from Lagom. Being an AMVA+ panel, it is vital to have proper black level output in order to appreciate the deep blacks these panels offer.
White level can be adjusted independently using the contrast setting in the OSD. After using test patterns, I settled with 80 as my preferred contrast setting. This allowed all relevant contrast grids to be viewed without issues. The color settings are very close to 6500K out of the box. Setting the picture mode to Standard, and the color temperature to Warm, yields a very pleasing picture. I found it slightly too red, and ended up reducing red to 80, and green to 84 to compensate (using color temperature settings). Most users will be fine without this adjustment. There isn’t a way to calibrate gamma unfortunately.
The panel delivered some excellent color reproduction and black levels, as expected. While not quite on the level of IPS when it comes to color accuracy, the panel presented very satisfactory results. Once the brightness is set according to your environment (around 20 in dark rooms), you can truly appreciate the depth of black across all forms of content, with an exciting, vibrant picture. If you’re used to TN-based monitors, you really owe it to yourself to experience this monitor.
ASUS sticks to their bread and butter OSD, which is quick and responsive. Unfortunately, it lacks black level and gamma adjustment.
Scaling:
The ASUS VN279QL is a 16:9 monitor with a native 1080p resolution. This allows all other 16:9 resolutions, including 720p, to be scaled perfectly to fit the monitor’s aspect ratio. The monitor provides three options to scale the image: Full, OverScan, and 4:3 (the latter only being available on 4:3 resolutions). I noticed no issues with scaling when using any of these presets. Most of the time, you will want to use Full, as it sets the picture to display all pixels from 16:9 resolutions correctly.
Measured Input Lag:
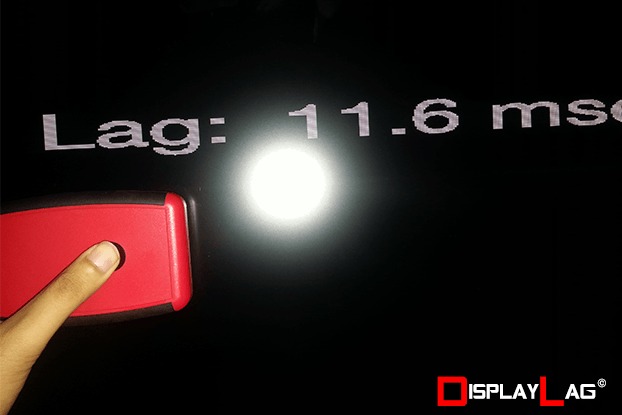
Finding a great picture with low input lag is a difficult task. Some of the best picture in displays today is often associated with horrendous input lag (check out our input lag database). The good news is, the VN279QL is an excellent monitor for gaming. I tested the display using both 1080p and 720p lag testing devices. Both devices yielded identical results, so PlayStation 3 owners that are forced to use 720p in some games do not need to worry about additional scaling lag. The input lag tests yielded the following results:
- Top: 4.5ms
- Middle: 11.6ms
- Bottom: 18.9ms
After averaging out the results, we get an average input lag rating of approximately 12ms. This puts the VN279QL under our excellent category, reserved for the fastest gaming displays. You shouldn’t have any issues with any form of serious gaming, whether it’s fighters, shooters, or performing speed runs.
Gaming Performance:
Using Super Street Fighter IV: Arcade Edition ver. 2012 as my preferred testing method, I had no difficulty performing the same crispy links that I am accustomed to on top gaming monitors, such as the BenQ RL2455HM or the ASUS VH238H. Having used the VH238H the night before, I was able to come to the VN279QL with identical timing, requiring no adjustment. This is great news, as the 27″ AMVA+ panel makes your games look significantly better than regular TN monitors.
With an average input lag of 12ms, the ASUS VN279QL is excellent for gaming in both 720p and 1080p.
Motion Blur:
One area that IPS and MVA panels have trouble matching their TN counterparts is response time. The VN279QL comes with a 5ms GTG response time, which is above average for the technology, though not quite as fast as the best TN monitors on the market today. The majority of users will not notice major issues with motion on this display, and it is in line with most other LED monitors on the market. Using the ghosting test from Test UFO running at 1920 pixels per second, I took a few pictures to illustrate the differences between the Trace settings found on the VN279QL. To prevent overdrive artifacts, I recommend using a Trace Free setting between 40 and 60, depending on preference. Overdrive artifacts are noticeably present when using settings 80 and 100, which I recommend avoiding.